Analysis of Causes and Solutions for Ceramic Shell Cracking
Blog post description.
he wei feng
1/11/20263 min read
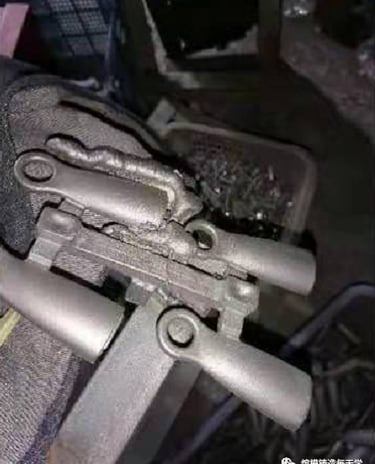
A friend from the south sent me several photos after following my public account, asking why his ceramic shell cracked at the root. I’d like to take this opportunity today to discuss this issue. Figure 1 shows the broken shell.
Let’s follow our usual analytical approach—what we call the reverse deduction method—and see if we can help this friend. Since we’re making remote guesses based on common practices, whichever point matches his situation is the one he should consider.
Let’s skip unnecessary introductions and get straight to the point: why did the shell break?
First, a shell cracks primarily due to insufficient strength. Shell strength includes both high-temperature and low-temperature strength. Issues with either can lead to cracking. Let’s start by analyzing low-temperature strength and examine what factors affect it. As the saying goes, “Quality depends on materials.” The primary material here is silica sol. Generally, for investment casting of steel parts in China, silica sol with 30% silica content is recommended, though slightly lower silica content may be acceptable for small parts. So, friend, you need to confirm the silica content of your silica sol. Next, make sure your silica sol hasn’t aged or degraded. Whether it’s from inventory or in use on the production line, it should be checked. Typically, during this season, the chance of silica sol degradation is low, but it’s hard to say for coatings in use on the production line. Silica sol coatings need to “drink water” (i.e., be replenished with water, especially the face coat), but some manufacturers aren’t aware of this. This can easily lead to increased silica content, causing the coating to age and degrade.
Additionally, drying conditions are crucial. There’s an old saying: “The quality of a shell depends mainly on drying,” especially for silica sol coatings. Low-temperature strength is largely determined by drying effectiveness. Good drying results in good strength; poor drying leads to issues. Therefore, you must carefully control the drying conditions for the face coat, intermediate coats, and backup coats. For the face and intermediate coats, low temperature and high humidity are ideal; for backup coats, high temperature and low humidity are better. Generally, the temperature should be around 24±2°C—lower for the face coat and mid-to-upper range for backup coats. Humidity should be 55%–65% for face and intermediate coats, and 30%–40% for backup coats. Moreover, the product’s structure and cluster design also affect shell drying. For example, overly dense clustering or products with deep cavities and narrow slots must be taken into account. Another point is the drying time for the seal coat. As the saying goes, “Haste makes waste”—don’t rush it. Generally, it should be at least 24 hours or more.
Shell thickness is another indicator of shell strength. How thick the shell should be depends on the size of the cluster and the product, not merely whether there are no gaps. It should be determined based on the cluster size. Also, consider the structural strength of the cluster’s sprue. Don’t blindly pursue high process yield. It’s possible that invisible cracks already appeared during shell building due to insufficient sprue strength, but went unnoticed. During dewaxing, small cracks can turn into large or even penetrating cracks, which may still go undetected. By the time casting occurs, it’s too late to address them.
Dewaxing is the first checkpoint for testing shell drying. If it fails, it indicates issues with shell drying. After dewaxing, carefully inspect the shell’s internal and external quality. Do not send cracked shells to the melting process, as this will only magnify the shell-building errors.
Melting is the second checkpoint for testing shell drying. It evaluates not only drying effectiveness but also the sintering results of the shell and the quality of the refractory materials used. If the shell has high impurity content, even with good drying, cracks may still occur. Why? Consider this: molten metal at 1600°C impacts a shell at 1100°C, testing the shell’s thermal shock resistance and high-temperature strength. Add to that the metal head pressure equivalent to the shell’s height and the initial velocity of the molten metal during pouring, and the bottom part becomes the most challenged area. Even minor cracks are likely to fail, leading to breakage.
So, how can this issue be resolved? Here are a few suggestions for this friend to consider:
Check your sprue to see if it’s too thin. After assembling the cluster, test it by lifting it to see if the sprue deforms.
Inspect the shell thickness to see if it’s too thin.
Extend the drying time for the seal coat to at least 24 hours or more.
You can also reinforce the backup coats with wire mesh or add an extra layer specifically around the sprue root or the entire sprue.

Analysis of Causes and Solutions for Ceramic Shell Cracking
Quality
Precision manufacturing for diverse industrial applications.
Services
Products
393055590@qq.com
+8615912702921